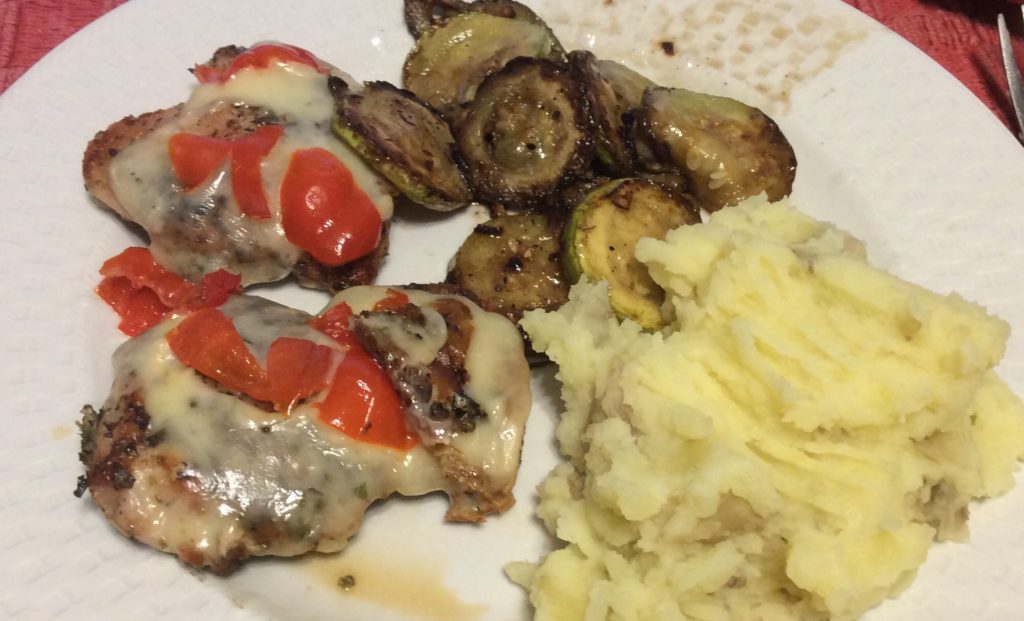
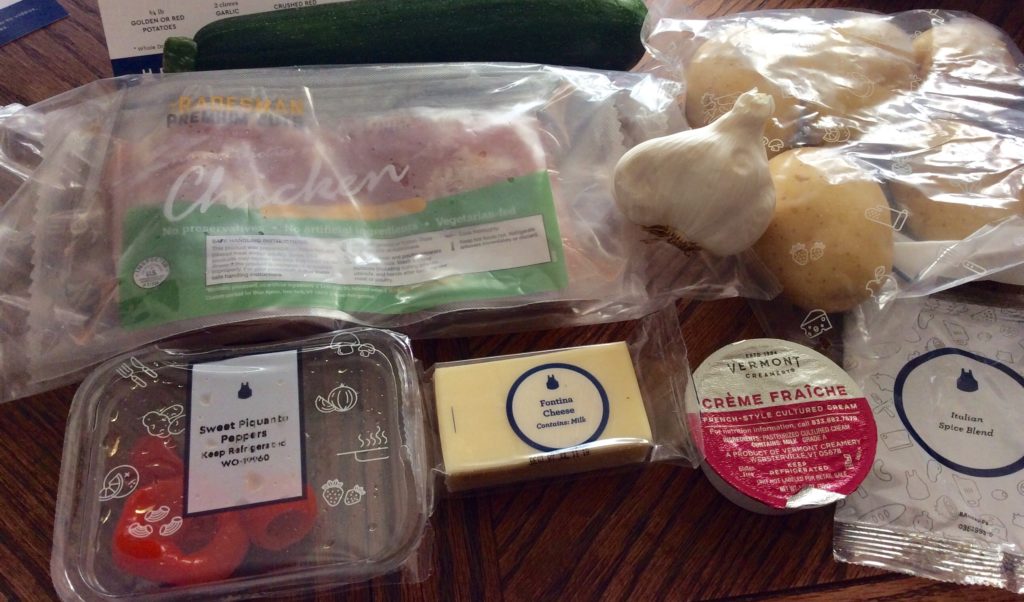
I’ve never had chicken with cheese before, and I was pleasantly surprised. Indeed, I made fish with a cream sauce and cheese a few days ago and that worked too! Cheese seems more flexible than I thought! The piquante peppers were a good choice.
The whole meal was very simple to put together. The chicken sprinkled with Italian seasoning and simply sauteed and then covered with cheese and the peppers for the last couple of minutes. I liked the flavor the seasoning gave the chicken. I did make a mistake and used the chicken breast for my last recipe and the chicken thighs for this one (I had assumed both packages had chicken breasts), but I’m not sure that made a difference. I did cook them for a shorter time as they were far thinner than the breast.
The zucchini was simply sauteed with garlic. I overcooked it some as I was dealing with the mashed potatoes and a stew I was making for my other daughter at the same time, but my daughter ate them. The mashed potatoes were pretty plain, but these ones at least had creme fraiche – a great improvement over the ones in the last kit that only had olive oil. Indeed, I didn’t even add the olive oil to these ones as it wasn’t a good flavor.
The ingredients were all there and all fine. All I had to provide was salt, pepper and olive oil.
I paid $12.50, or $6.25 per serving, for this kit with a sign-in promo. It was worth this but probably not the $20 regular price.
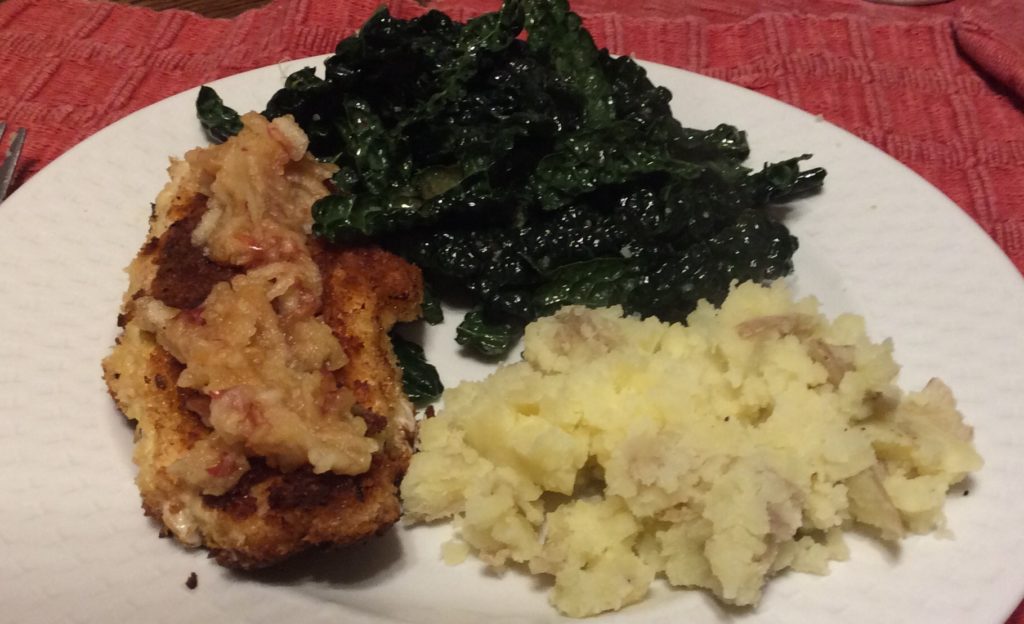
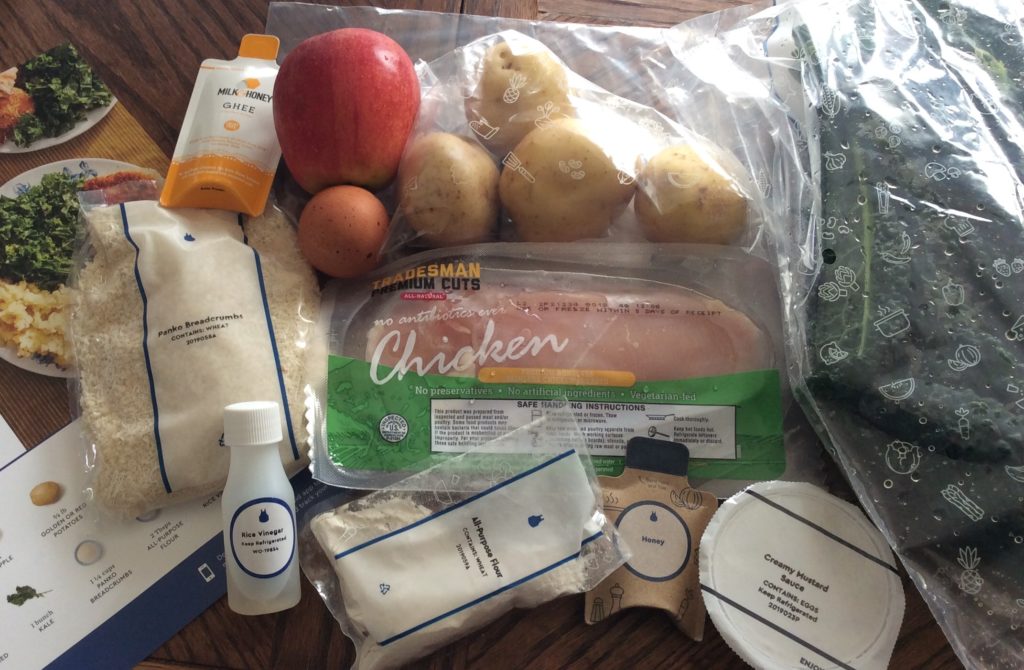
I got this meal kit for to make for Crispy Chicken Schnitzel with Mashed Potatoes & Creamy Mustard-Dressed Kale for my non-vegan daughter and me, but I ended up eating it mostly by myself: my daughter ended up with other plans. No matter, I saved the chicken breast for her for tomorrow and I’ll make her some fresh mashed potatoes with potatoes I had at home.
This is a meal that is more like disparate components than one full meal. The components all work with each other, don’t get me wrong, but you could substitute any of them for something else and the meal would still work. I’m not sure if that’s good or bad.
The chicken schnitzel itself was good – but it wasn’t really a schnitzel. The breast pieces were skinless and boneless but they had not been flattened – nor were there any instructions to flatten them. Moreover the cooking times given were for a thick piece of breast. The chicken was fine, but it would have likely been juicier and more enjoyable if it’d been flattened first. The flavor was OK, but not extraordinary given that there was no seasoning beyond salt on the breading. Commenters suggest adding onion and garlic powder to the flour, I’d also add dried oregano or fresh chopped parsley to the egg.
UPDATE: It turns out that the schnitzel part was my fault. Blue Apron had sent me boneless chicken thighs for this recipe, and the chicken breasts for another one. I didn’t look closely and just assumed both were chicken breasts and ended up using the wrong cut.
The apple slaw that accompanied the chicken was also good, but it didn’t really improve the chicken substantially. I also ended up with way too much slaw.
The mashed potatoes, which are simply mixed with olive oil and salt, were below average. The olive oil flavor was too strong. My vegan daughter didn’t like them. Personally, I think the recipe should have had you mix half the ghee with olive oil to fry the schnitzel, and use the rest of the ghee with the mashed potatoes. Commenters also suggest adding a couple of crushed garlic cloves to the potatoes.
The real star of the meal was the kale, however. It was dressed with a “creamy mustard dressing” which is just Dijon mustard and mayo, mixed with honey and salt. It was delicious – I don’t even like kale but I ate the whole thing (my daughter didn’t want to even try it, and I figured it’ll be soggy tomorrow). I’ll definitely try this dressing on other stuff (recipe below).
All the ingredients for this kit were there and they were fresh. I love that Blue Apron includes ghee for cooking rather than relying of you having butter at home (as HelloFresh does). And I also loved the container for the egg.
The only mild inconveniences is that it’s winter, and I don’t keep my house particularly warm, so the honey was crystalized by the time I went to use it. The ghee was also pretty hard. Don’t refrigerate either when you get them – at least in winter.
The meal was all in all satisfying – though I did eat all the kale by myself. It was also relatively quick and easy to prepare. And it’s also easy to recreate at home with your own ingredients.
I paid $12.50, or $6.25 per serving, for this kit with a sign-in promo. It was worth this but probably not the $20 regular price.
Creamy Mustard-Dressed Kale
2 oz kale or fresh baby spinach leaves
1 Tbsp. mayonnaise
1 Tbsp. honey
1 tsp. dijon mustard
salt to taste
If using Kale, remove central stem from kale leaves, then cut into strips.
in a medium bowl, whisk together the mayo, honey and mustard. Season. Add kale and mix well, using your hands to make sure all the leaves are coated.
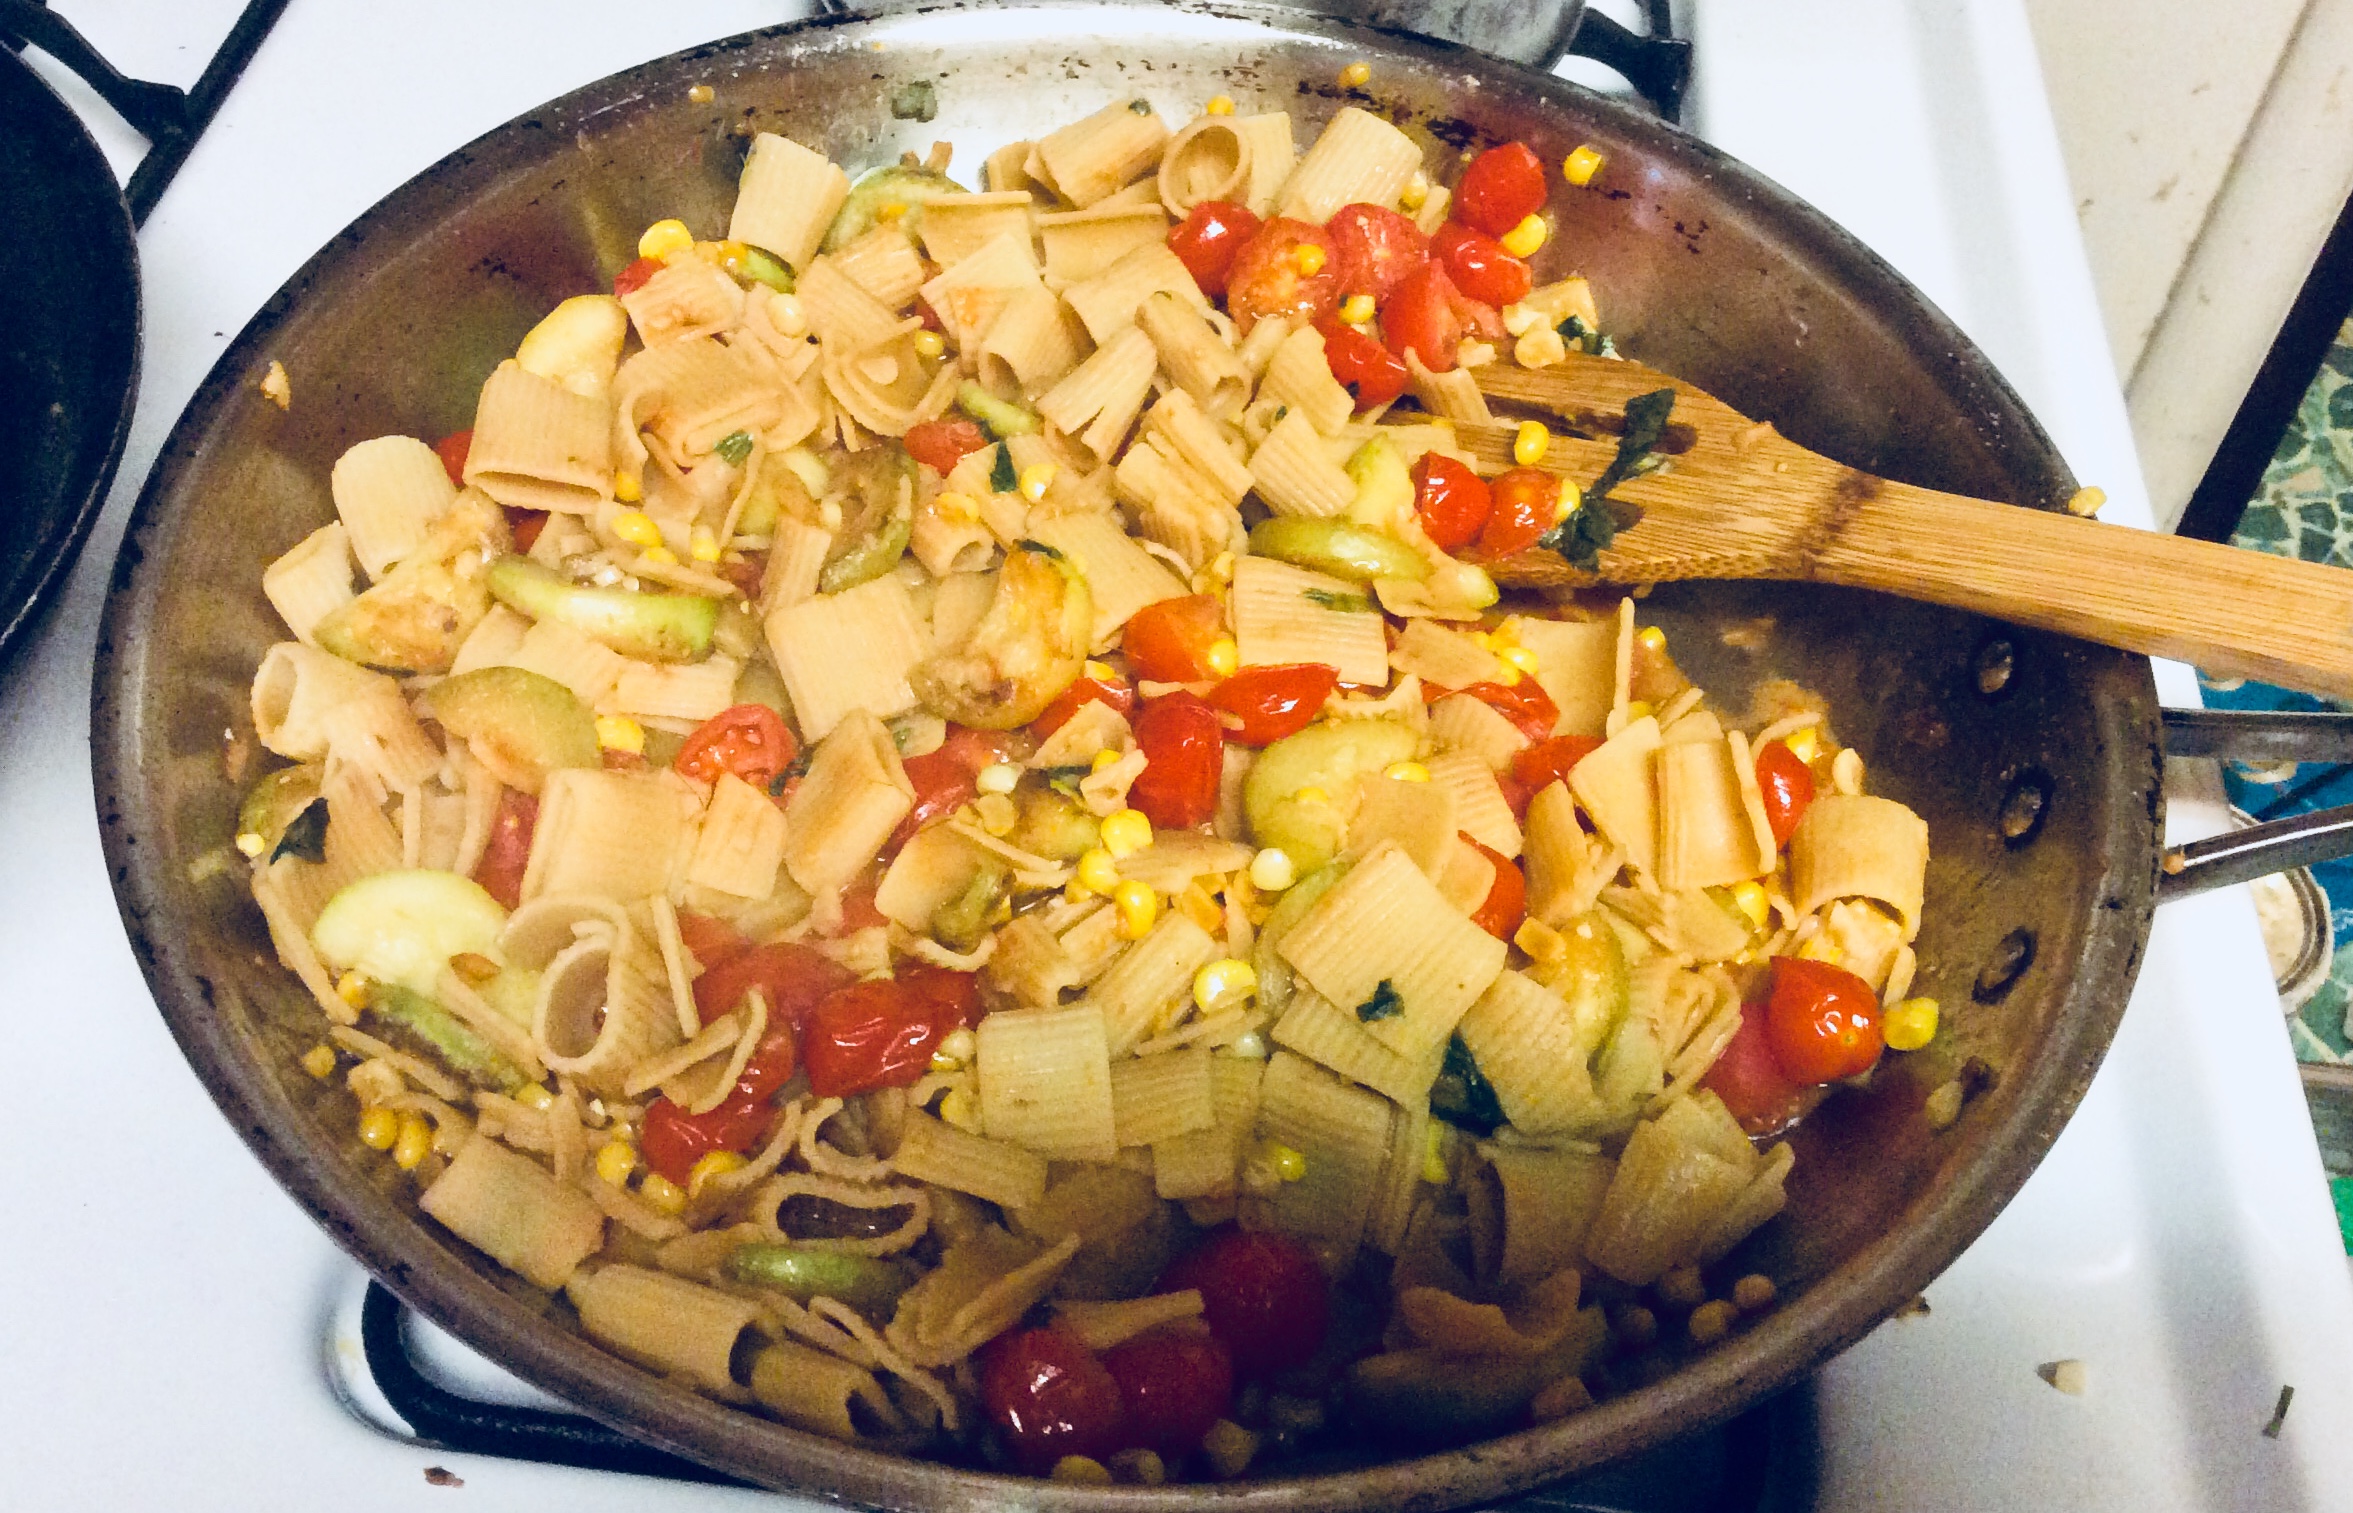
My vegan daughter is into zucchini. She only recently discovered it (i.e. was willing to give it a try) and now she can’t get enough. I made her pasta with zucchini the other day, by just winging it, but tonight I decided to actually shop for and follow a recipe. I decided on this Blue Apron recipe for Fusilli Bucati Pasta with Summer Squash, Corn, & Tomatoes because it was simple and easy to “veganize”.
I did, of course, make some changes to the recipe – as you can see by ingredient list below. Instead of fusilli, I used rigattoni pasta. I prefer to give my kids chickpea pasta, rather than wheat pasta, as it has more fiber and protein – and Grocery Outlet, my closest grocery store, didn’t have chickpea fusilli. I used more garlic and more corn than what came in the Blue Apron kit because it was so recommended by the people who commented on the recipe. I used zucchini instead of summer squash as we’re still in winter and cherry tomatoes because they were easy to find. And I used Romano/Parmesan/Asiago cheese mix because that’s what I had at home – though instead of adding it to the pan, I served it on the side. I did the same with the butter. That way, both my vegan and my non-vegan daughters were happy. Finally, I used basil instead of parsley because several reviewers said basil worked best.
My kids were very happy. My oldest daughter liked it as much as any meal kit I’d ever bought – and while the youngest didn’t like the tomatoes (she’s currently anti-tomato), she just picked them out. The kids particularly liked the corn, which added crunch and sweetness to the dish. Next time I’ll experiment with using other types of tomatoes to see what work best for both girls.
In all, I spent $9 to make this recipe – a significant saving over the $20 it would have cost if I bought it from Blue Apron. This includes the price of the ingredients I had to buy in larger quantity than needed (e.g. the pasta and corn, which they only had packaged by four cobs), but not of the items I had at home.
Blue Apron Ingredients
My Ingredients
Cost
½ lb Fusilli Bucati Pasta
½ lb chickpea rigattoni pasta
$2
2 cloves garlic
3 cloves garlic
pantry
1 ear corn
2 ears corn
$4
1 Summer Squash
1 Zucchini
$1
½ lb Heritage Globe Or Cocktail Tomatoes
10 oz cherry tomatoes
$2
¼ tsp Crushed Red Pepper Flakes
skipped
N/A
2 Tbsps Butter
2 tsp butter
pantry
2 Tbsps Grated Pecorino Cheese
Romano/Parmesan/Asiago cheese mix
pantry
1 bunch Parsley
6 basil leaves
garden
Pasta with Zucchini, Corn, & Tomatoes
This recipe feeds four, it doubles the recipe in the kit.
Ingredients
1 lb pasta of your choice
4 ears of corn
1 lb cherry tomatoes, halved
salt & pepper
2 Tbsp. olive oil
2 Zucchini, cut in 1/3″ thick half moons
6 cloves of garlic, minced
1 bunch basil leaves, coarsely chopped
butter to taste (optional)
Grated cheese to taste (optional)
Directions
Put a pot of salted water to boil. When ready, add the pasta and cook until al dente.
Meanwhile, cut corn kernels off the cob and discard cob and silks. Season halved tomatoes with salt and pepper.
Heat olive oil over medium-high heat in a large saute pan. When hot, add the zucchini slices all in one layer and fry until brown, 2-3 minutes. Season with salt and pepper. Add corn and garlic and stir fry for two minutes. Add the tomatoes, season, and stir fry for another minute. Turn down heat to low. Mix in half of the chopped basil.
Once the pasta is ready, drain, reserving 3/4 cup of cooking liquid. Add pasta to the vegetables and mix. Add the cooking liquid and cook over medium-low heat for a few minutes, or until the water boils off.
Transfer to serving plate(s) and sprinkle remaining basil on top. Served accompanied by butter and cheese.
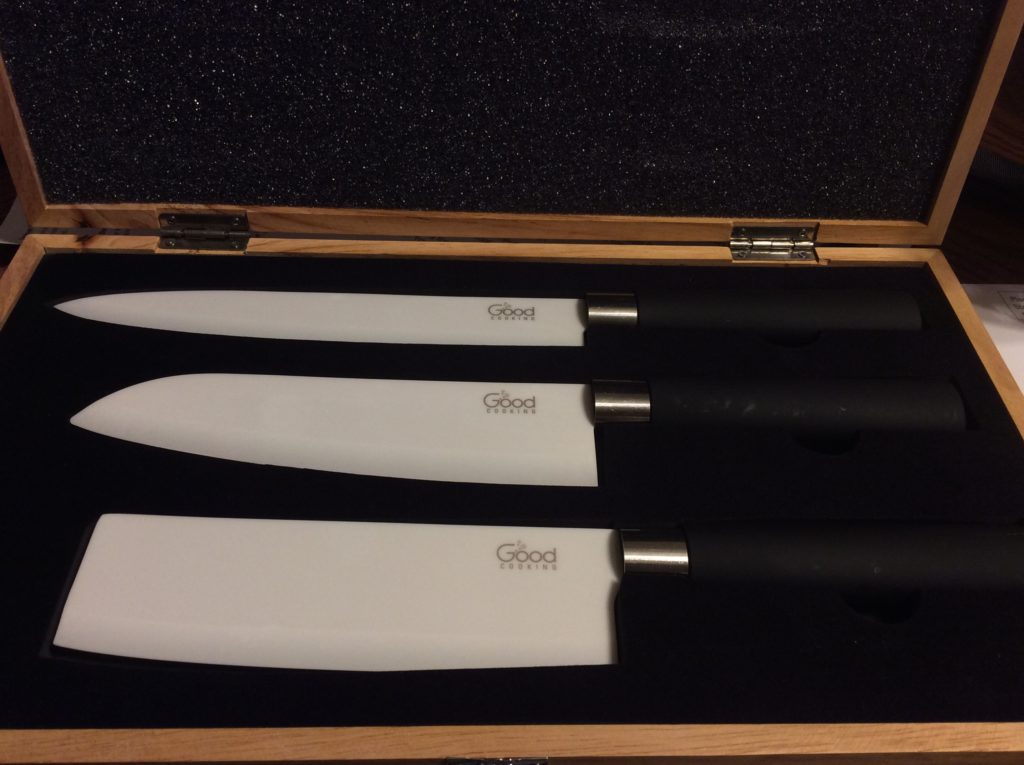
Yesterday, I was shopping at Grocery Outlet when I came upon a set of Good Cooking ceramic knives. I don’t have a smart phone so I couldn’t look at reviews for them, but at $30 for the set I figured they were cheap enough to take a chance on them. They were worth pretty much what I paid for them and no more.
I’ve been using Kyocera ceramic knives for years, and I just love how sharp they are. Cutting vegetables or meats is a breeze with them. Plus I’ve never had to resharpen them. Unfortunately, a couple of years ago my trusted Kyocera “bread” knife broke while I was cutting some tough vegetable and later, it developed a chip.
Mike got me a Kyocera set of knives for Christmas that year, and they were just as good as my previous one as far as sharpness went. But the chef’s knife in the set – the one I use most often – almost immediately developed a chip and then another, and then the tip broke off (when I was washing it, I think).
I love using those knives – but they’re too expensive to be this disposable. Kyocera presumably will replace knives damaged due to a manufacturer defect – but I’m not sure if being easily broken is a “defect” or a nature of the product. Amazon reviews of the knives are filled with photos of chipped knives. I wrote to Kyocera with photos of my knives, but have not yet heard back.
Meanwhile, the Good Cooking knives are not nearly as sharp as the Kyocera. They work more like regular steel knives. This is likely because they are thicker than the Kyocera.
I assume, for that reason, these knives will last longer – but only time will tell. Reviews online are not particularly encouraging.
If anyone knows of a brand of ceramic knives that are both very sharp and don’t get easily broken, please comment below.
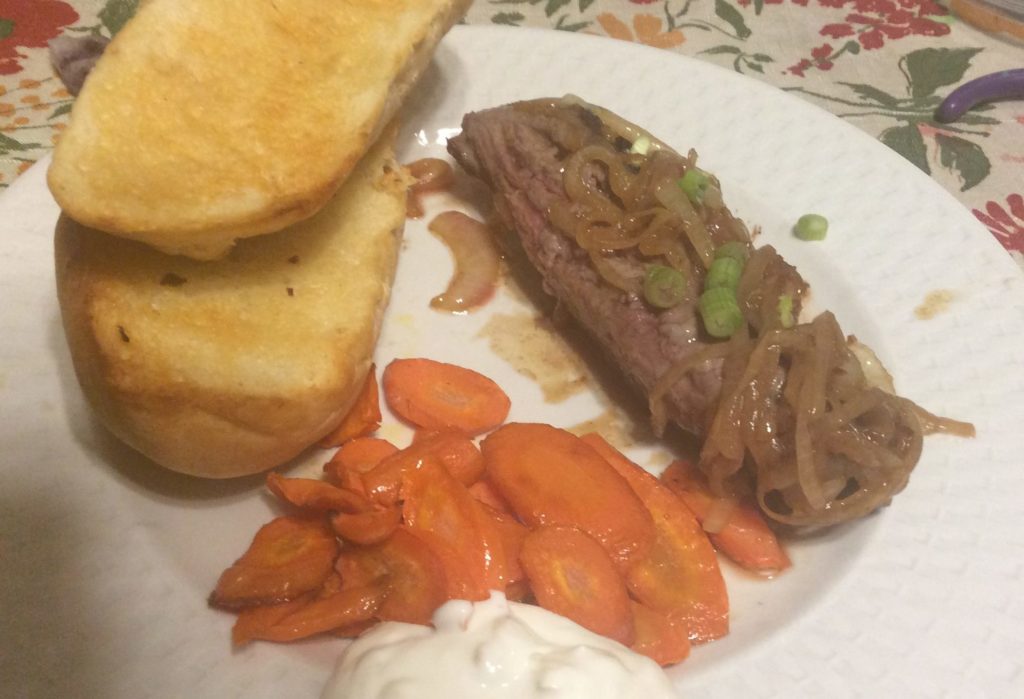
This meal kit for Sirloin and Horseradish Cream Sauce with Garlic Bread and Roasted Carrots may be the first HelloFresh kit that really failed to impress me. It was acceptable dinner fare, but very pedestrian. There were no new flavors here, no tricks, no recipes I’d care to copy and repeat. It was ultimately what it looks like: meat with carrots and garlic bread, with some onions and sour cream. I’ve had it all before (indeed, I had pretty much the same dish concept from EveryPlate – HelloFresh’ cheaper meal kit brand). Moreover, it seems to me that HelloFresh is trying to cut corners and send out cheaper ingredients and ask cooks to include more and more staples of their own to the meals.
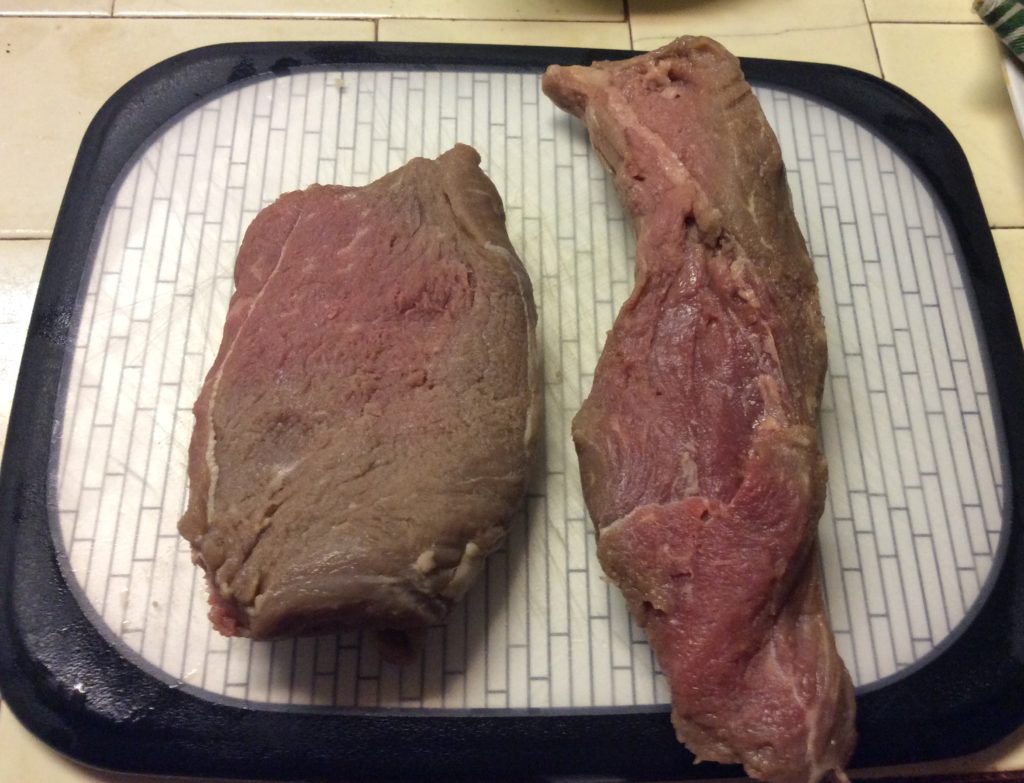
The main ingredient of this meal was the sirloin and I was unimpressed with the quality. The meat was tough and wasn’t particularly flavorful. The two steaks sent had very different shapes from each other and, as you can see above, they were partly discolored, which took from their visual appeal (at least before cooking).
The steak was stopped with sliced onions cooked with beef stock which were fine, but unremarkable. I wondered if HelloFresh was cutting corners by not including demi-glace instead of the stock concentrate.
The accompanying horseradish sauce was also disappointing. It was basically sour cream with a few green onions and horseradish powder. I think it might have been better with some prepared horseradish.
The carrots were just carrots – not my thing but my husband happily ate them just like he has every other time a kit has included carrots.
Finally, the garlic bread included the same “semi-baguette” buns that were included in the EveryPlate meal I referenced above. Once again, I really liked the consistency of the buns. I didn’t like that I had to provide my own butter – I understand that from EveryPlate, but I expect more from HelloFresh -, and I specially didn’t like that the kit included garlic powder instead of fresh garlic.
At the end of the day, however, I am likely to blame for choosing this kit. But I’ve noticed that I’m not particularly excited by many of HelloFresh’ kits – I’ll be suspending for several weeks now as I can’t find much in their upcoming menu I actually want to eat.
Update: I have 3 referrals for 1-week free of HelloFresh. E-mail me if you’d like one.
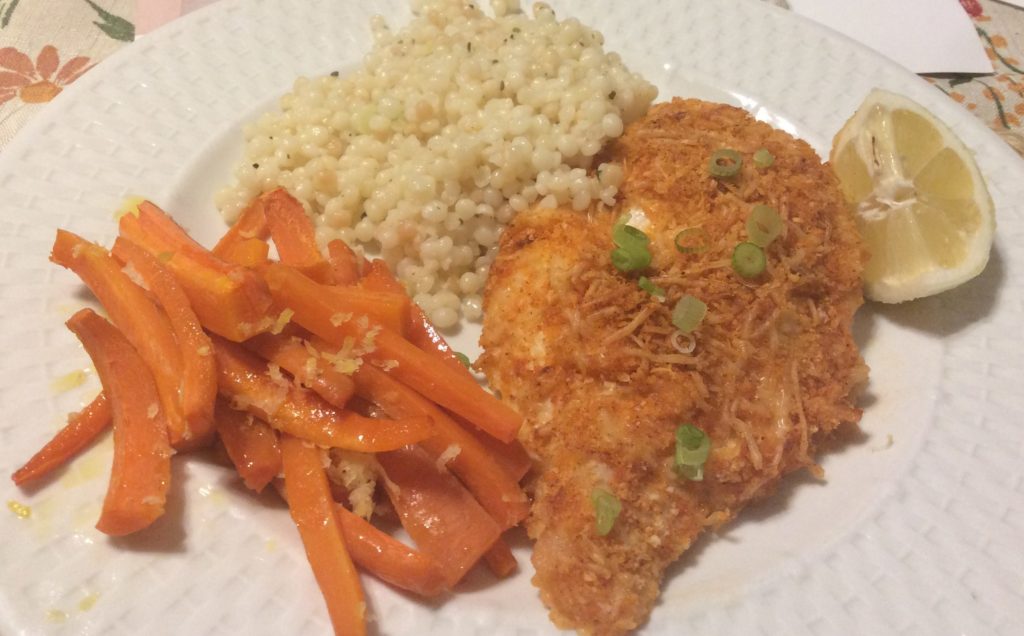
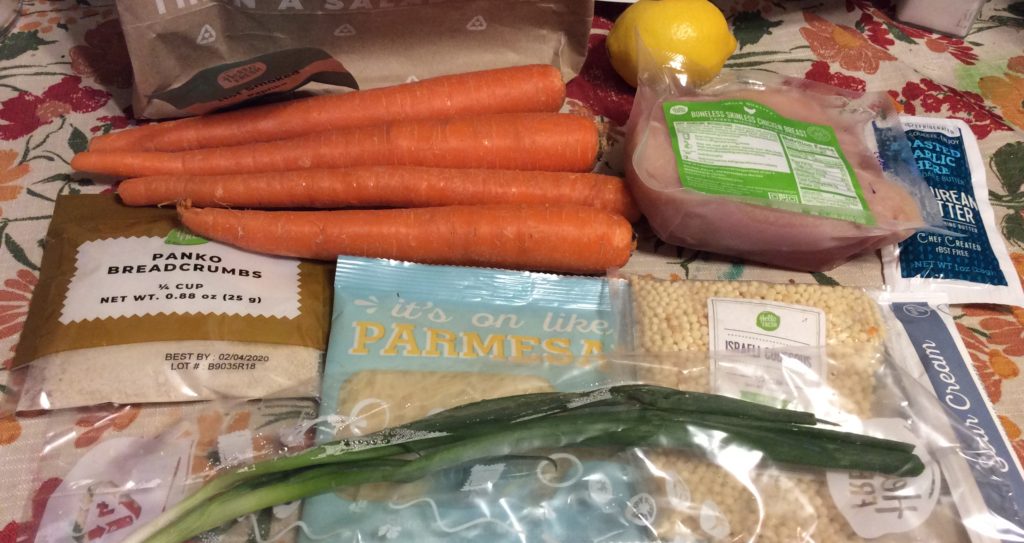
Believe it or not, in my half century in this earth, I’d never had Parmessan chicken. Indeed, I’ve never though of cheese and chicken as two ingredients that belonged together. Still, this recipe for Crispy Parmesan Chicken with Garlic Herb Couscous and Lemony Roasted Carrots sounded like something my picky younger daughter would eat – after all, the chicken looks like a chicken milanesa, and she loves milanesas.
Once again, this was a pretty simple recipe to put together and it didn’t really have any exotic ingredients (Israeli couscous was exotic once upon a time, but it’s now easily available). You can make it with ingredients easily found at the supermarket. Still, the chicken was moist and tasty – the smokiness of the paprika really came through. I quite enjoyed it.
The couscous, however, lacked flavor. It would have been better if some of the Parmessan for the chicken (there was more than enough) was used for the couscous.
I don’t like carrots, but my husband – who ate mine – thought the lemony carrots were good. All you do is roast carrot sticks for 20 minutes, with a little olive oil and salt, and then sprinkle grated lemon zest and lemon juice on them. My daughter, who also tried them, wasn’t fond of them, however.
For some reason, the recipe for the chicken called to only bread it on one side. It didn’t say why, so I breaded it on both. It was a good call.
I cooked this kit the day after I got it, and all the ingredients were fresh and I felt of good quality.
I paid $14 for this meal after a discount or $7 per serving. I think that was an appropriate price for a home cooked meal, though obviously I could put it together for less than that if I bought the ingredients myself.
The recipe for the chicken is below. While it calls for 2 chicken breasts, there was enough breading for a third one. It serves two.
Crispy Parmesan Chicken
1/4 cup panko breadcrumbs
1/4 cup fresh shredded Parmesan cheese
1 tsp smoked paprika
2 boneless, skinless chicken breasts (~6 oz each)
salt & pepper to taste
2 Tbsp sour cream
Preheat oven to 425F Line a baking sheet.
In a medium to large bowl mix together the breadcrumbs, Parmesan cheese and paprika.
Dry chicken breasts with a paper towel. Sprinkle with salt and pepper. Brush sour cream over both sides of the breasts. Transfer them one by one to the breadcrumbs bowl and press breading onto the chicken surface. Transfer them to the baking sheet and bake for 15 minutes.
“These pears are getting soft,” my daughter announced from the kitchen.
I sighed. I buy so many produce that goes bad because the child that requested it forgets about it. Indeed, I buy so much food that goes bad before anyone uses it. As it happened, at that very moment I had a two or three week old puff pastry sheet in my fridge. I’d bought a package to make mushroom empanadas for my vegan daughter and only used one sheet.
The softening pears I knew I could use – but the puff pastry? I searched online and found people asking if they could use it a few days to a week after putting it in the fridge – but two to three weeks? That seemed crazy! Still, my pastry sheets did not smell bad, they had no hint of mold in them (I do keep my fridge very cold), they were not slimy and they only had a couple of spots were they’d dried out and even then, not too much. So what the heck! I figured I’d use them.
I placed the puff pastry on a cutting board and rolled it a bit with a rolling pin. Then I transferred it to a lined cookie sheet. I sliced the pears somewhat thinly (I used the two large ones I had) and placed the pear slices on the puff pastry. I mixed some raw sugar with a bit of cinnamon, nutmeg and ginger and sprinkled it on the pears. Then I ground some almonds and sprinkled these on top.
I put the baking sheet in the fridge and turn on the oven to 400F. Once it was preheated, I put the baking sheet in the oven and baked it for about 20 minutes.
The results were great. Really, really delicious. And vegan!
My daughter had a craving for zucchini tonight (!), and I didn’t really have many ingredients to work with. So I sauted succhini slices in some olive oil with some chopped garlic (I used 2 cloves but should have used 4), cooked some chickpea pasta, and then added it to the pan. The zucchini had started to caramelized by the time I added the pasta and it was pretty sweet. I added some fresh thyme, and my daughter was quite happy with the results.
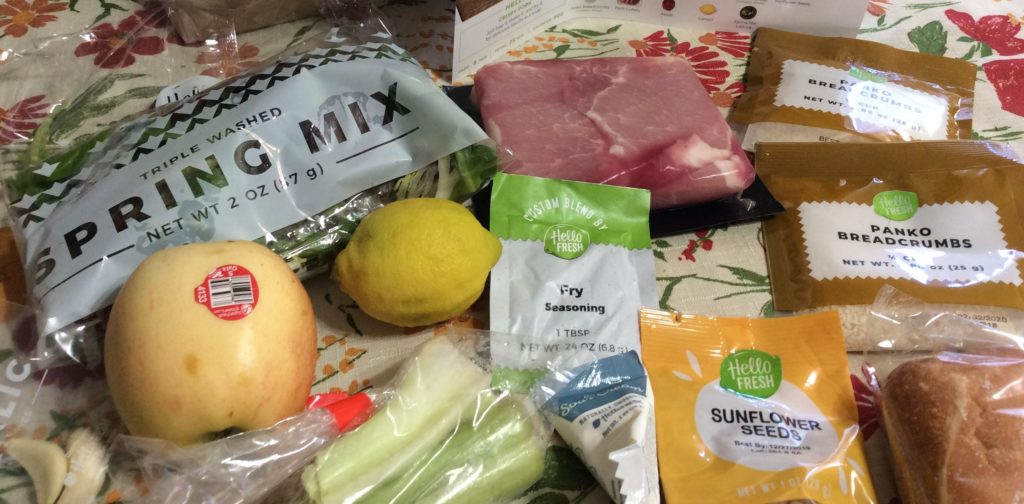
Some times the best meals are the simplest. There is nothing complicated about this HelloFresh meal of Breaded Pork Cutlets with Garlic Bread and an Apple and Sunflower Seed Salad. Nothing exotic. It can be simply put together with supermarket staples that won’t have you searching around up and down the aisles and things you already have in your pantry. And it’s very tasty and very satisfying.
All the ingredients came fresh and stayed that way, even though I cooked the meal four days after it arrived. The pork wasn’t dry and the seasoning was spot on. However, they listed the amount of kosher salt to add, but they neither included it in the kit or listed kosher salt as a needed ingredient. I didn’t have kosher salt around, so I used a smaller amount of table salt. The original recipe called for breading the pork in a plastic bag, but I used a bowl as I didn’t have a gallon ziplock bag around and I’m already using too much plastic by getting these meal kits. A bowl worked just as well.
I very much enjoyed the salad. Mine came with mixed greens – though I see HelloFresh also offers it with just arugula – and a yellow apple (golden delicious?). The dressing was olive oil and lemon juice – I’ve not been fond of this combination in other salads, but it worked here. The star of the show were the sunflower seeds, however, which added crunch and a faint sweetness to the whole thing.
I’m not giving this kit a perfect 10, however, because Hello Fresh did not include the butter needed to make the garlic bread and I didn’t have any at home. I suppose I could have looked at the list of ingredients that I needed to have at hand for this recipe before I chose it, but the whole point of meal kits is to not have to go shopping for the ingredients. Particularly in the case of this meal, where all the ingredients are so easily available, if I’m going shopping for butter, I might as well pick up the rest and cook the meal for a fraction of the cost. I understand that Hello Fresh is trying to save money by not providing the butter, but it’s still not cool.
In any case, I think oven-baked garlic bread is not a good choice for this meal. Both the pork and the salad can be put together rather quickly, but making the garlic bread requires preheating the oven, which is both a waste of energy for such a small meal, and a waste of time. Instead, they could have suggested toasting the bread in the same pan where the pork was cooked.
I’m also dinging the recipe because I was still hungry when I finished – even though I ate a lot of salad (there was plenty of it). Perhaps that’s due to not being able to make & eat the garlic bread.
After the discount, I paid $14 for this kit or $7 per serving (regular price would have been $20/kit or $10/serving).
BREADED PORK CUTLETS
1/2 cup panko breadcrumbs
3/4 tsp salt
1 tsp garlic powder
1 tsp onion powder
1 tsp paprika
4 pork cutlets
2 Tbsp sour cream
vegetable oil for frying
1/2 lemon, cut into 2 wedges
In a medium bowl, combine breadcrumbs, salt and spices. In a different bowl or plate, coat pork cutlets with sour cream (you may need to use your fingers to spread it). Transfer the cutlets to the bowl with the breadcrumbs and coat well.
Heat a 1/4″ layer of oil in a large skillet over medium-high heat. Once hot, transfer cutlets into the skillet and fry on each side, about 2-3 minutes per side. Transfer to paper towels to absorb extra oil. Serve with lemon wedges on the side to squeeze on the cutlets.
APPLE AND SUNFLOWER SEED SALAD
1 apple
1 celery stalk
2 oz spring mix
1 Tbsp olive oil
1/2 lemon
1 oz sunflower seeds
Core the apple and slice into thin slices. Thinly slice the celery.
Put apple, celery and spring mix into a medium bowl. Dress with olive oil. Squeeze the lemon half on it and mix. Add the sunflower seeds and mix again.
This week I went back to Hello Fresh, as I didn’t like the offerings of any of the services I hadn’t yet tried – and I was given a good deal ($20 off each of 4 boxes) for re-activating my account. I got just two meals (which frankly, works better for us, as I’m always rushing to cook all kits before they go bad) and tonight I made the first one for my daughter and I. It was pretty good.
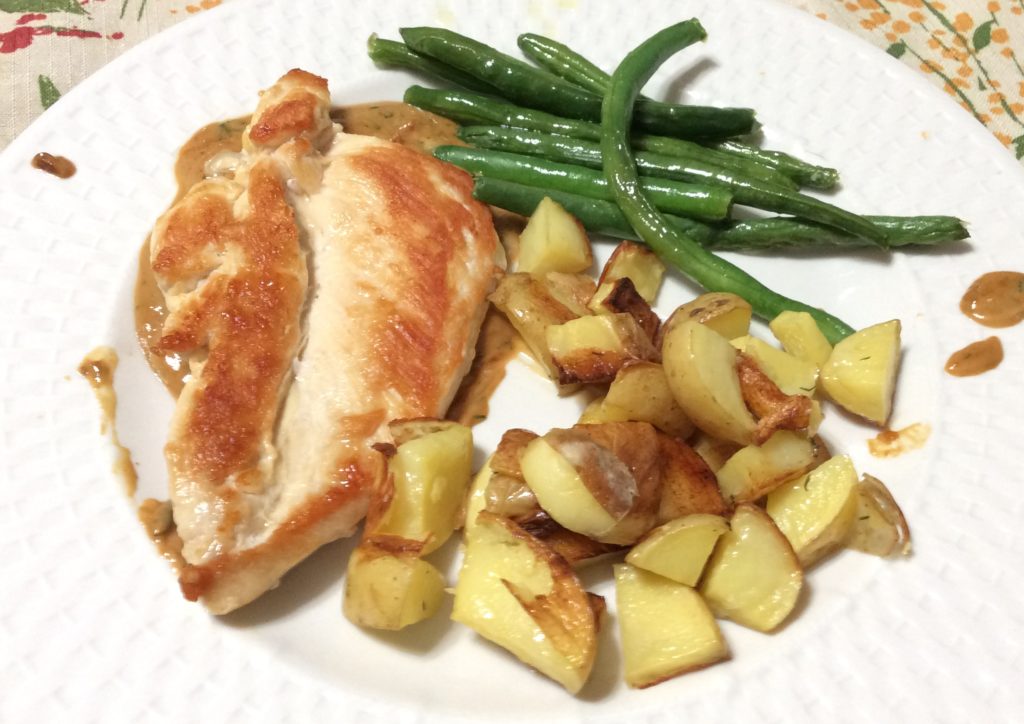
This meal of Creamy Dill Chicken with Roasted Potatoes and Green Beans was extremely simple: you cut and bake some potatoes, baked some green beans, sauteed some chicken and then made a quick sour cream-mustard-dill sauce. Still, it was a tasty and satisfying meal and I very much enjoyed the sauce (recipe below). My daughter didn’t have any sauce, but she liked the other elements.
There were some problems, however. The main one is that there wasn’t enough sauce. What they sent was barely enough for one serving (so it was fortunate my daughter didn’t want to try it). They need to double the ingredients for it. Secondly, the chicken breasts were too thin and they cooked in less than the 4-6 minutes per side that they recommended. Also, the portion size was a bit on the small size (or I was particularly hungry).
This is a very easy meal to put together on your own, however. I think I will add dill to the herbs I grow on my window to be able to easily make it again.
After the discount, I paid $14 for this kit or $7 per serving (regular price would have been $20/kit or $10/serving).
Update: it’s spring and this kit now comes with asparagus instead of green beans. I ordered it again – forgetting I’d already had it – and served it to my husband this time. He loved the dill sauce. Once again, there wasn’t enough of it.
Creamy Dill Chicken
2 boneless, skinless chicken breasts (12 oz)
salt & pepper to taste
1 Tbsp olive oil
2 Tbsp sour cream
2 tsp chicken stock concentrate
1 tsp fresh chopped dill
1 tsp mustard
2 Tbsp water
Pat dry chicken breasts and season with salt & pepper. Heat oil in a saute pan over medium heat. Add chicken breaths and cook until cooked through and golden, 3-6 minutes per side. Turn off heat, remove chicken and keep warm.
Add the sour cream, chicken stock concentrate, dill, mustard and water to the saute pan and mix well, scraping up the brown bits on the pan. Serve chicken with sauce.


Recent Comments